Momma Told Me: 2016

Blog Archive

From Here To There: Lessons Learned In 6 Years of Blogging #BeginningOfME

This post was inspired and sponsored by Domain.ME, the provider of the personal domains that end in .ME. As a company, they aim to promote thought leadership to the tech world. All thoughts and opinions are my own.
The true secret to being a sucessful blogger is.....#BegginingofME #AD
Momma Told Me: You've come a long way, baby.

I call myself the anti-blogger.

It sounds much more rebellious than it is- honestly, it's a lot less anarchy and angst, as it is a lack of concern for 'best practices' and consumer preferences. Yes, consumer. Because I am the publisher and you are consuming my content, whether it's of the most mundane incidental topics, or intended to help get you to buy a brand of butter used in my latest recipe. Even in the absence of physical advertising, I am selling myself to you, the reader, asking for your time viewing my content in exchange for my time creating it. And, let's face it, there are MILLIONS of competing 'advertisers' out there.

But that, my friends, is where I couldn't care less- I don't care whether I have 20 subscribers, or 20 million. Sure my sponsors do- but if I never got another sponsored opportunity to blog again, that would be fine with me. Just as long as my personal branding always remains genuine and in tact.
And, whether you intend to blog for profit, or fame, or simply to share with family across the country the progress of your growing family- it's the authenticity of your voice that truly sells your content. SEO, fancy photos, interactive widgets- they're all just tools to help market your voice to those who would naturally be drawn to it, but may not have otherwise had the tools to discover it.

With this in mind- let's step back in time for a brief moment.

On Monday, June 21, 2010 I sat down at my laptop with a kitten curled on my chest and a cup of coffee on my desk. I'd been married 8 months. A previously full time (3 jobs full time) working independent woman who'd been asked to leave her job and stay home in anticipation of the family she would never start. (But that is another story, a story strewn across the pages of this blog.)
I began writing my blog because I was lonely, lacking a challenge, and desperately wanted to be heard. For months I'd read others and found insight in their stories, recipes and general life anecdotes. I was fascinated by the sea of characters I'd come to know and love, characters as real in life as myself.

I began in 2010 as a review blog- yet another place in the Blogosphere dedicated to someone spouting their opinions and insight on a myriad of items they may or may not have ordinarily used, except for the fact it arrived on their doorstep. And in less than a month I registered my blog as a website, a domain, a 'dot com'.

At the time, paying my hosting fees and setting up a web address seemed like all I needed to do to feel 'legit'. I was proud of my accomplishment, which had taken a whopping 8 minutes, and felt I was just as entitled as any other to run my mouth on the most mundane of topics with really no expertise or qualifications. www.mommatoldmeblog.com- it was concise, it was to the point- this was a web address for a blog called Momma Told Me. Looking back, I wish I'd known to really focus on that instant, that moment, of defining my voice. A personal domain could have truly helped me stand out as the individual I was, and am.
Naturally, that's how Momma Told Me began- but that's not what Momma Told Me is today.

Where I started out as a bored housewife, in a failing marriage, with a point and shoot camera and a growing propensity for Crazy Cat Lady like behavior, my little space on the internet not only grew with skills and knowledge, but with me. When my marriage ended I re-focused my energy on myself, and who I was. I slowly stopped writing reviews and hosting giveaways, and soon began focusing on how I could share the parts of me that added value to my voice. (Want to learn a little more about me? Check out this post!)

My fellow bloggers would tell me how they'd taken this class, or invested in this new camera, and how it had elevated their content. I'd politely nod and listen, then return to my-point and shoot.

In fact, while my photography has come so very far in 6 years, and could without argument benefit from professional education or equipment,  I still, to this day, only shoot in natural light, with the same camera I've had going on 4 years now. Surely the first photos I took with that camera have come a long way to the photos I share on my site today- I have grown tremendously without buying in tot his or that. Why? Because I have always felt honing my voice, and sharing in my vision, and my style, is far more important that creating styled photos that look like a 5 million subscriber model-blogger.
At it's core, blogging is about growing with your audience, and giving them a bit of you that is real enough to bring your online character to life. While my very first post, to this day, has only 79 views, I have content with over 200k, and some social media with half a million shares. And yet, I still write an organic post here and there that only seems to reach a few hundred, or a thousand.

Do I spend time worrying about those posts? No- the people who click through on the less frilly, more raw, otherwise offering nothing but an opinion or story, content, those are my people. They're the people I really blog for. Those are the people who saw my last name change, Truffles the cat turn into #TrufflesTheTuxie, and the first photos when we brought Nora home.
Of course, I'm not saying the tens, or hundreds, of thousands of views on my recipe, hacks, or craft posts are any less important. I value each and every person who takes even a few moments of their busy day to see what I've created, or weigh in on my opinions. In an ideal would would my PINs for content I spend countless hours generating, hard earned money on supplies for, and painstaking time crammed in my little photo nook shooting be seen by every possible person who would find it of interest or use? Of course! But at the end of the day my blog is my voice, and I have a life outside my blog (gasp!) so it's all of the people who discover me, and keep returning, because they love the pieces of me I share, that really make blogging successful.
Domain.ME #BegginingofME #AD
Of course, as excited as I was to register my blog as a domain, those 6 years back, defining your voice by registering a domain is nothing to balk it. It is a big deal. If you are going to stress over a technical aspect of your blog, it should be the physical address people use to view it. After all, it's the first 'face' they put to you, right?

That's why my second biggest tip is to give your voice the most memorable, and accurate, depiction of yourself as you possibly can. Domain.ME is a premium domain provider that helps, really anyone, do that. Whether you're a small business just starting out or an aspiring blogger with a big voice and a passion to share. .ME's receive all the same benefits as a .COM and are in no way penalized by SEO, so you can add a little flair to your place on the web and really stand out with personal branding.

In fact, I've been thinking of a few domains I might try to register with Domain.ME that might really sum up who I am and what Momma Told Me is all about- For example, how awesome would it be to log onto MommaTold.ME to check out my daily adventures? If you had a personal domain ending in .ME, what would it be, and how would it sum you and your online presence up? Why not head on over to Domain.ME and see if it's available? The internet can seem like a crowded place- but as long as you stay true to your voice with originality, and candor, you'll find your audience!

What Daughter Says: Don't lose sight of yourself- stay true to your voice and you'll always find true success.
http://dot.me/BeginningOfME

Handmade Wreath Gift Tags Tutorial + Gifting Swiss Chocolat Frey Giveaway 12/18

This is a Fashionista Event and a promotional item was provided to me by Chocolat Frey. Hosts for this event are Still Blonde after all these Years and ModlyChic.
Dazzle your dinner guests and serve your Eggnog cocktails in hollow reindeer from Chocolat Frey®! #FreyHoliday #ChocolatFrey #AD
Momma Told Me: It's the holidays- time to be sweet!


Starting at the age of 4 Momma began instilling a strong importance of handmade gifts."It's the thought that counts," she'd say as she watched me scribble out my name on our homemade wrapping paper. Every year we'd have a different project. Our family was always on a budget, but our handmade presents allowed us to stretch that budget and make gifts for everyone in the family, as well as teachers, postal workers, and neighbors. One year it would be walnut shell ornaments, another hand poured candles, and the next custom bath salts. Of course my favorite year was the year we decided to give chocolate- and made 3 of Momma's favorite seasonal recipes to gift in decorative holiday tins. It was also the most delicious year.
#FreyHoliday #ChocolatFrey #AD
As an adult I've made an effort to continue this tradition by incorporating a handmade element into my gifts, or gift wrapping, each year. This year I'm terribly busy juggling the blog, a full time job, my volunteer position at the daycare, bowling, and a move from this tiny condo into a 4 bedroom house. Everyday I spend a few hours on this and that, but the time seems to fly right by! So this year I'm going back to my favorite holiday gifting memory, and sharing the joy of chocolate, alongside a few handmade touches. Naturally, any old chocolate won't do- gifts this special require a bit of class in the form of Authentic Swiss Chocolat Frey®. Delicious GMO-free and bean-to bar processed chocolate that is as delicious as it is sustainable.
Something as timelessly elegant as fine chocolate deserves a presentation that is as equally timeless and heartfelt, so I knew immediately I wanted to make handmade gift tags for my Chocolat Frey® gifts. Chocolat Frey® comes in a wide assortment of varieties and sizes; shareable Napsli mini bars (perfect for filling gift baskets or stockings), artfully crafted Assorted Pralines Boxes, Aura™ Almond Intrigue Bars, and even seasonal hollow chocolates like the Chocolat Frey® Reindeer collection. That means I can put together a large gift bundle for my grandparents, or simply recognize my bowling teammates with a delicious bar. All adorned with a handmade gift tag, of course.
You can make about 12 of these handmade wreath gift tags for under $5 with the following supplies:

1 Package Wire Fir Branches (10")
1 1/2" Red Velvet Wire Ribbon
Pack of Manilla 'Luggage' Style Gift Tags (Includes Twine)
An Old Dictionary
A Cup of Strong Coffee
A Glue Stick
Hot Glue Gun
First you'll want to pour your dark coffee into a shallow dish or bowl. It doesn't matter how fresh the coffee is, though I find warm coffee tends to set richer stains and much quicker than cold coffee. The staining process really is quite simple- dip, splash, and daub coffee on to your heart's content. Use a coffee mug, dipped in coffee and 'stamped' on your tag to create traditional coffee rings. Layer stains over a few hours, or days to really add character. Do not be discouraged if your tags simply look like one coffee stained mess at first-  as the tags dry they will pull the color out of the liquid and create their own unique splotched and patterns.

Next tear some strips of paper from an old dictionary. I chose to target words of seasonal importance, such as 'jingle,' 'joy,' and 'christen' to help add to the mood of the tags. You'll want to tear them about 1/2 the side of the footprint of your tags, so as to allow the character of your coffee handy work to still really shine. Attach them towards the top of your tags with a glue stick.
handmade gift tags
hadmadern weath gift tags
Next, cut your fir branches to about 7" and wrap them in a circle, twisting  the two open edges together. Placing the twisted end at the top, hot glue the 'wreath' to the tag.

Cut a strip of your ribbon, approximately 9" in length and tie a messy bow. Trim the ends in a 'v' shape to add a little extra detail and hot glue the bow to the top of your 'wreath'. Tie your twine strands through the top to complete your gift tags.
These handmade wreath gift tags are cheap and simple to make but pack a big 'wow' factor! #FreyHoliday #ChocolatFrey #AD
These handmade wreath gift tags really have that 'wow' factor and look like they take far more time and skill than they actually require. Trust me on this one- the first thing I'm always asked is 'where did you buy these tags?!' followed by 'how much will it cost for you to make me some?' Of course the adorable mini wreath and seasonal sentiment is quickly forgotten when the recipient tears into their Chocolat Frey® gift and everyone starts sharing the joy of such a delicious present.
Chocolat by Frey® Napsli miniatures are individually wrapped bites of Swiss chocolate perfection, perfect for any gathering! #FreyHoliday #ChocolatFrey #AD
Sometimes I wish I had time to hand make a treat for large groups of people- like neighbors, or the entire bowling league- but I simply don't have the time this year. Instead, for our annual potluck I'm making 4 dozen Dark Chocolate dipped spoons- the perfect companion to our Keurig bar where people can add an instant blast of gourmet fine Chocolat Frey® to their coffee, eggnog, or hot chocolate, thanks to this little hack I devised with their Napsli mini bars.

And, before we continue can we stop to take a moment to appreciate how adorably awesome these Chocolat Frey® Dark Napsli individually wrapped 'bite' sized bars are?!
Using some elegant 'fancy' plastic silverware from the party store and by melting 20 unwrapped Chocolat Frey® Dark Napsli bars in a microwave safe bowl (on high for 1 MIN) I can prepare gourmet favors in just minutes. I gently spoon just enough to fill each piece of plastic cutlery, then place each spoon on a foil lined cookie sheet and decorate with edible stars or non-parells. 5 minutes in the freezer and I have the hottest attraction at my holiday potluck! Don't forget to put out a bag or bowl of the Chocolat Frey® Napsli mini bars for your guests to grab and take some home too!
Chocolat Frey® hand dipped hot cocoa spoons. #FreyHoliday #ChocolatFrey #AD
If you really want to take this hack to the next level consider packaging a few dipped spoons in clear confection wrappers with your favorite K-Cups in a coffee mug! 2 spoons melt perfectly into warm milk (or milk substitute) for the perfect hot cocoa also!
Dazzle your dinner guests and serve your Eggnog cocktails in hollow reindeer from Chocolat Frey®! #FreyHoliday #ChocolatFrey #AD
And if you aren't already the hostess with the mostess this holiday season, thanks to your adorable gift tags on genuine Swiss Chocolat by Frey® gifts, and Swiss chocolate dipped stir spoons, you might want to break out the piece-DE-resistance- Chocolat Frey® Hollow Reindeer, served as eggnog vessels. Whether it's a nightcap seasonal cocktail, or some refreshing post- holiday meal eggnog, these hollow reindeer will captivate and delight your most special guests and have everyone feeling like a kid again!
As much fun as I have while entertaining, this season really is about giving- You don't have to be Martha Stewart, or rich, to gift gifts that really make your recipients feel special. After all who doesn't love fine chocolate? You'll find the Chocolat Frey® varieties featured here at Sam's Club, Shaw's, Meijer and more. Learn more about the brand and follow them through their social media handles on Facebook, Twitter, Instagram, and Pinterest then follow the link-up below for more amazing Chocolat by Frey® inspired gifting ideas.

What Daughter Says: Spread holiday cheer with simply sweet gifts and handmade touches.


Enter below for your chance to win a Chocolat Frey® seasonal prize package valued at $55, then hop along to the other blogs for more chances to win!

Deck The Cat Tree Tutorial, D.I.Y Yarn Pom-Poms + How To Rock The Holidays With Pets!

This shop has been compensated by Collective Bias, Inc. and its advertiser. All opinions are mine alone. #RollAwayLint #CollectiveBias
#RollAwayLint, Glitter, Catnip, Yarn, Tree Bristles and more this season with these tips to Rock Your Holidays With Pets! AD
Momma Told Me: Sometimes things just get a little...hairy.

If there's one thing every pet parent can relate to, it's the constant juggle to balance your pet's presence in your home with your unique style and flair.

At the risk of sounding like a crazy cat lady, there was a time in my life I considered cat hair more of a statement decoration, than a nuisance such as dust or stains. I simply learned to live with and accept certain things to be true; I would never wear another article of truly white clothing, any electronic I needed to use imminently was the best seat in the house, and stepping on a squeaky toy in the middle of the night beat stepping on a Leggo. Of course, having Jay around, an outsider in my home, made me see there just might be a need to fight the madness. Having pets didn't mean I had to give up fashion, design, or comfort. We could actually co-exist together.
And, while we seem to have found a balance of style and convenience that meets the cat's approval (because, let's face it, the cat's far more picky than the dog ever will be,) the holidays always pose their own unique struggles. This year, on top of them, we're actually moving into our new home smack in the middle of the holiday season. In an effort to dissuade the cat from her usual tree- shenanigans I invested a new, thin, tree which would prove impossible to scale (at least we like to think) and less delicious to the cat. This dream lasted about 2 days, at which time I immediately proceeded to my local Target for some inspiration.
Nothing's ever going to be quite as exciting as a giant cat brush tree, but I knew I could lure the cat back to her intended hangout- the literal cat tree, with a few simple improvisations and pet safe decorations. I also knew there was no way I was inviting my family into my new home for the holidays with a cream color cat tree that actually looked grey. So I made a beeline for the household cleaning supply aisle in hunt of a solid lint roller that could de-fur my household in time for holiday visitors.
We're not talking some ordinary junk drawer emergency lint roller either, we're talking a heavy-duty, multi-purpose utility tool with the power to remove layers of cat hair, dust, fibers, and foreign objects from nearly any soft surface. Available in multiple sizes, the Scotch-Brite™ 50% Stickier Lint Roller is not only stickier than ever (yeah, duh, it's in the name!) it's an easy to grip magical eraser of all your holiday pet shame. Okay, it's a roll of super duper sticker, easy to tear, sheets that conveniently stick to and roll on a variety of surfaces so you can roll and move on with your life- without pulling out the vacuum cleaner. And, as a crafter and Pinterest addict, I use Scotch-Brite™ 50% Stickier 4.8" Lint Rollers to pick up pretty much every wayward material, from glitter and sand to ribbon and yarn.

Pssst! Take advantage of a great Target Cartwheel offer for 15% Off A Scotch-Brite 50% Stickier Lint Roller (11/27-12/3)!
Now for a brief admittance of my failure as a pet mom- Our maltese-yorkie, Nora, loves to dress up- but the cat insists on hunting out her wardrobe and rolling in it like a fresh pile of laundry. Nora never knows the difference, but I feel a twinge of guilt that I let such sibling rivalry go on under my roof. It's embarrassing for me to walk out of the house coated in cat hair, so it doesn't seem right the dog should have to prance around in it. Thankfully my Scotch-Brite™ 50% Stickier Lint Roller 80 sheet 4.8" rollers from Target pull dryer lint, holiday glitter, and cat fur right off Nora's most festive clothes, so she can get back to looking dapper.
And who doesn't think tiny dogs belong in tiny sweaters during the holidays? I like to think Nora was one the best dressed at our family's Thanksgiving meal! She might be getting a little shaggy with her Winter coat, but her holiday style is on fleek ya'll!
Meanwhile, the cat continued her calculated assault on our new Christmas tree. Quickly she decided, just because the branches would not support her weight to lounge and climb didn't mean she wouldn't meticulously pull and bend as many of them downward as possible. I can only turn the flattened side of the tree to the wall twice before I have to 'build' the entire tree again!
So part 2 of my master plan was set into motion- With an old pot, water, red food dye, gloves, and 10' of sisal rope, I began preparations for operation 'Christmas Cat Tree.' Of course, what I wasn't counting on was for Southern California to have 1 of it's 5 days of annual rain on the day I'd intended to dry my stained rope- so the rope I'd placed out on the grass to dry in the sun quickly became drenched, and faded. While my rope underwent Take 2, I proceeded to make some yarn cat pom-poms to adorn my completed cat tree.
Making large, cat safe, yarn pom-poms is relatively easy and can be done by anyone with a hand, scissors, and yarn.

1. Begin by wrapping the yarn of your choice around your 4 out-stretched fingers 100-120 times.
2. Carefully remove the roll of yarn and place it on a flat surface.
3. Cut a strip of yarn approximately 9" long and feed it through the center of your yarn roll.
4. Bring both ends of the cut yarn up towards you and tie in a tight double knot.
5. Turn the roll of yarn over and tie the yarn, once again, in the same direction across the middle. Double knot the yarn, ensuring the bundle is tied tight.
6. Your yarn should resemble a bun. Feed your scissors in to the many loops, cutting down the middle all the way around to create a messy pom-pom.
7. Trim the edges of your pom-pom to shape as you desire.
Keep your cats busy, all year round with these D.I.Y cat yarn pom-poms. #RollAwayLint AD
Yarn pom poms can be made in a variety of sizes and, when made tight, can be played with by event he most enthusiastic of 'prey' hunting cats. Consider making them from white yarn to resemble snowballs for the Winter season. Treat them as unwanted scraps, discarding them on the floor casually, or leaving them on the edge of ledges and tables to help incite excitement from your cat.
I find I can make 10-15 pom-poms in about an hour chilling on the couch watching the Twilight Zone- but all the trimming and shaping of the yarn really makes a mess. Tiny little fibers tend to go everywhere, and soon I look like I'm shedding, myself. A quick swipe with my Scotch-Brite™ 50% Stickier Lint Roller picks up stray threads off any nearby blankets, couch cushions, carpet, or even my sushi leggings.
Would you ever decorate your cat tree for the holiday season? Deck The Cat Tree with this simple and fun tutorial! #RollAwayLint AD
So now that we've had some fun preparing our decorations it's time to truly trim the cat tree. Gather all of your supplies and expect to be interrupted every step of the way. If your home is anything like mine items will continually disappear whenever you turn your back. Here's what you'll need:

1 yard of holiday print fabric/fleece
Cat safe (wire free) ribbon- I prefer burlap
Handmade, or bought, felt holiday light garland
Scotch-Brite™ 50% Stickier Lint Roller 60 Sheet 8" Roller
Candy Cane Red (hand dyed) sisal rope
Damage free decor/photo hanging hooks
Hot glue gun
Cat yarn pom-poms
Miscellaneous seasonal pet toys
First thing's first, take your Scotch-Brite™ 50% Stickier Lint Roller and roll the heck out of your old hairy cat tree. It took me 9 sheets to restore our medium sized cat tree to it's former glory- a good portion of the first swipes collecting larger debris such as sisal rope shreddings and cat nip.
Nest, cover your cat tree's largest cubby/hideout with your chosen fabric. Most cat trees screw together with a hex wrench and can be easily dis-assembled with minimal effort. If you can remove any attachments on top of the hideout temporarily, your handi-work will look a little cleaner.

Drape the fabric over the edges of the hangout/perch/cube and trim it so that it just drapes over the edges by 4-5". Tie a knot in each corner to adjust the length of the cover to match the end of the surface. Cut a pinhole in the center of each corner, and attach them to individual (damage free) photo/decor hooks. Attach the hooks to the bottom of your cat tree. You may need to wipe down this surface prior to application to ensure the best stick.

Cut any needed slits in side panels to ensure your cat can freely enter and leave their favorite hideout.
Deck The Cat Tree with this simple and fun tutorial! #RollAwayLint AD
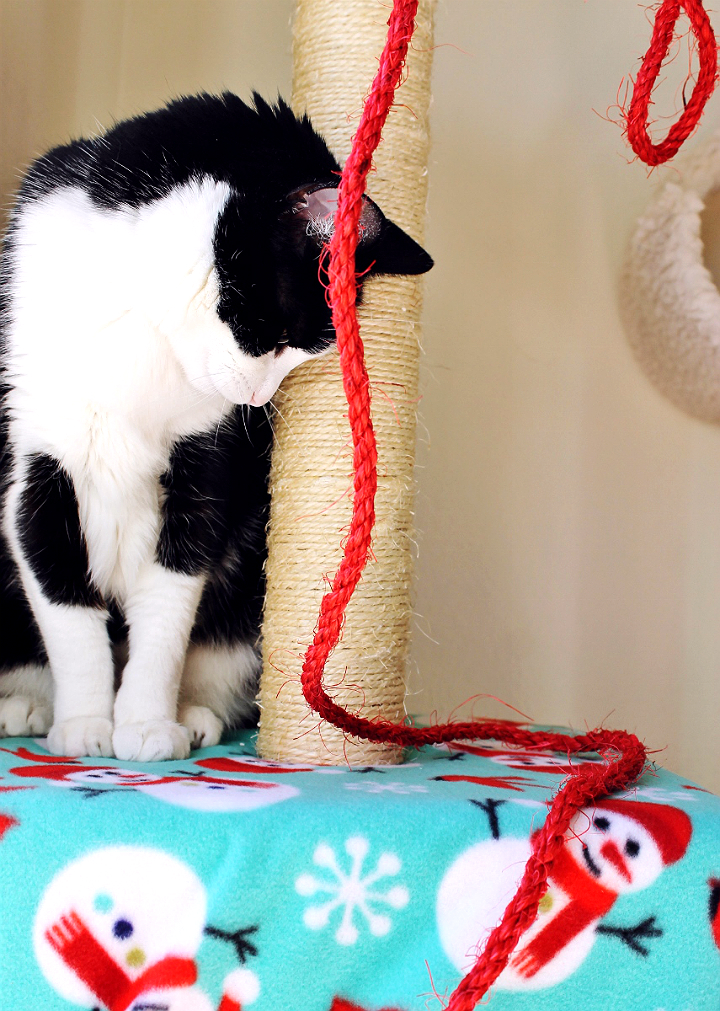
Next you'll grab your beautiful red rope- or, in my case, you're follow the rope through the house until your find the end, attached to the cat. Well, at least the cat had the right idea- Yes, please DO play with this, and NOT the delicious looking gingerbread tree.
Now it's time to plug in your trusty hot glue gun. Note: The dog will not be impressed, more than likely she's wondering how exactly it is that the cat bends you to her every will like this.

Regardless, carry on and begin wrapping the red sisal rope diagonally across your cat tree's main scratching post, as to create a 'candy cane' swirl illusion. Since the rope I'd chosen to use was on the thinner side, I doubled two wraps around for my final effect. Apply anchoring glue to the ends of the rope, and once in the middle- the glued rope will easily remove without leaving marks at the end of the season- or when your cat deems it simply must go.
I'd originally intended to use my burlap (wire free) ribbon to add a 'bow' to my 'wrapped' cat cubicle 'gift,' but instead thought it would make a nice accent to the 'much too tiny for any adult cat' perch. A big, sloppy bow was about as fancy as I got here.
If you really want to hit the decor jackpot invest in, or make, a simple felt holiday light garland to tie around your cat tree's highest point. It just so happened this was the perch atop the pillar I'd wrapped like a candy cane, so it all worked out rather nice. I also placed a reindeer chew toy in the useless tiny cat perch, and tossed several of my handmade cat pom-poms on the tree and nearby.
Deck The Cat Tree with this simple and fun tutorial! #RollAwayLint AD
I have to say, the cat tree is now officially more festive than our actual holiday tree, and I couldn't be happier with how it turned out. Prior to it's seasonal renovations Truffles, the cat, hardly paid notice to the cat tree but to stop and watch a stray bird now and then. Now it's the happening place to watch humans from a snowman cat cave alongside the flickering holiday lights. And it's one tree I don't mind getting destroyed!
Deck The Cat Tree with this simple and fun tutorial! #RollAwayLint AD
So there you have it- my best tips for surviving the holidays as a pet parent, with a little sanity, and style in tact. And, if you're not quite feeling all Martha- Stewart (though dressing up the cat tree took about 30 minutes and no skill what-so-ever) you simply must invest in Scotch-Brite™ 50% Stickier Lint Rollers. They're like an immediate makeover for all of your pet-accessible surfaces! Now, tell me, what sort of things would you refresh with all new Scotch-Brite™ 50% Stickier Lint Rollers from Target this holiday season? Need a little more inspiration? Check out what some other creative bloggers are doing with theirs this holiday season in the Social Hub!

What Daughter Says: Don't let hair, fur, or glitter get in the way of your holiday style, re-imagine the holidays with pets and more!