Momma Told Me: The future is complicated.
Do you remember opening up a gift on Christmas morning; that brand new Malibu Stacy Dream Car you'd asked Santa about all year? Your tiny fingers attempt to tear apart the cardboard packaging, but they just can't seem to manage to break through all of the staples, twist-ties, and tape. Finally your mother spots you and gingerly pries the shiny new toy from your hand with promise she'll be back in just a moment for you to play. But moments turn into minutes, and minutes turn into what seems like hours and days in your adolescent mind. It turns out Momma had forgot to double check if she had extra D batteries and her screwdriver was a tad too big for the tiny plastic screws. Tears began streaming down your face and you secretly vowed never again to let something that looked so cool pull you in with it's promise of simple operation.

I'll admit, halfway through my Bio Bubble Aquarium setup I felt similarly frustrated. You may recall that we had set Gary (the Beta fish) up with his 1 Gallon No Clean Aquarium last year. It was a breeze, but it was limited in size and really could only keep a simple Beta fish happy. When I had the chance to experience a state-of-the-art, futuristic looking, new concept in animal habitats, the Bio Bubble, I was immediately romanced by the sleek curves and unlimited possibilities. Suddenly, I had to have more fish. What, exactly makes the Bio Bubble Aquatic so special? A patented expanding sleeve, which hides in the base, turns this fish tank from flawless dome into practical care-taking and cleaning. If you've ever dreamt of having a coffee table that doubles as a fish tank, this is about as close as you will get on a consumer budget!

I had a few frustrations when initially folding through all the tiny 'instructions cards' bundled with each of the aquariums parts. There was an initial Instructions Pamphlet, but most of the phrasing was written deceptively simple. On several occasions I had to go back and watch the demo video on the brand's website to clarify operation. On a few topics I truly had to scratch my head for a few hours before I stumbled upon the answer. I know I'm clearly not the only customer to appear baffled by this wondrous futuristic habitat- there are plenty of reviews complaining about customer error that seems like it could have been avoided. But have no fear, the company is listening and working actively to provide more demonstration videos and specific product warnings to guide users down the right path at initial use. And then you also have me, who is here to point out my foibles and guide you with photos!
(I should note that Bio Bubble does provide customer support by phone, unfortunately, I was not assembling my tank during those hours.)
You will feel less overwhelmed if you leave accessories and parts in their pre-sealed sleeves until the directions tell you to use them. Be sure that you have picked out a stable surface for your BioBubble prior to set-up. Take special consideration that the aquarium may get up to 30lbs heavy when filled with decorations and water, and that you will need to change the water (25% according to a pet specialist ) once a week. The Bio Bubble also requires 2 plug in outlets for the pump and filter, as well as a third if you wish to use the branded LED light cap. We chose to buy an affordable power strip solely for the aquarium.
Because the Bio Bubble can be transitioned from Aquatic to Avian to Amphibian (and just about anything else) habitat, there will be a bottom 'plug' included with your kit. You do not need this for the aquarium. Instead, remove the filter O-Ring from it's package and carefully smooth the included lube along the O-Ring. Next, insert the O-Ring into the bottom groove, on the inside of the habitat floor. Then place the pre-assembled filter on top of the hole and twist Clockwise to lock it in place.


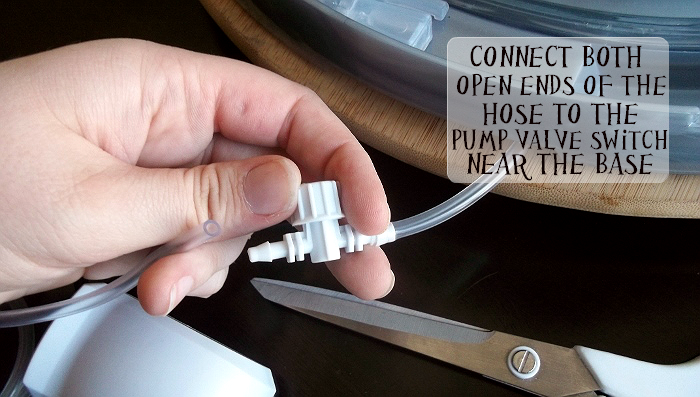
Next you will set up your pump. Attach one end of the air pump tubing the bottom of the filter base (from beneath the unit.) You will likely need an extra pair of hands. Next, place the Bio Bubble down and splice the tubing about 2-3" from the base of the unit. Connect the pump valve between the spliced hosing to allow you to turn the aeration (bubbles) on and off without unplugging the pump. You will need to add an air stone or aerator decoration to the filter (from inside the Bio Bubble) prior to adding water and fish. You may use the air pump as is but note it will only dispense large and loud bubbles without an aerator stone to diffuse the bubbles. Smaller bubbles are not only quieter, but also have more surface area and help to keep your aquarium free of nitrate buildup.
Note: The pump included with the Bio Bubble Aquatic is a value, or basic, pump. It is small and very loud. I quickly replaced this pump with a Tetra brand Whisper Pump for about $10. You can easily attach any pump of your choosing to the set up hosing and filtration. Simply disconnect the hosing from the original pump and attach it to your new pump- you can even use the installed valve switch from above!

Installing the Dome Gasket is perhaps one of the most important keys to your Bio Bubble Aquatic's success. It is also, arguably, to most frustrating. The instructions were very brief, and 'simple,' as to the point I almost felt stupid as I was wondering why the dome wouldn't close with the latches, when the gasket was installed. That's because I'd installed it wrong. It took 3 adults to not only figure out that the gasket has a slit on the bottom (skinny) side that needs to be fed along the lip of the dome. It also took the same 3 adults 15 minutes to jimmy the very tight seal gasket around the dome and in place. It is supposed to be a tight fit, so do not feel discouraged if this part of the set-up takes a while. Rest assured, once in place around the entire dome, it will not pop out.


You're almost there- Now it's time to install any extras you may have purchased for your Aquarium. Bio Bubble habitats are very versatile and the company makes several expansions and add ones. If you've already purchased your decor for the aquarium be sure to place it inside to get an idea of the space you have left for fish and additional plants/decor. Keep in mind, whether you are using sand or rocks, you will likely be filling the flooring up to the lower lip of the Bio Bubble. You may wish to cover the filter, visibly, with an aerating decoration. There are several rocks and pieces of decor with filter and aeration hookups you can place in the center. Just remember that the filter needs flow and access to water, so your decoration should have multiple 'holes' or outputs for bubbles and water.
Keep in mind that the Bio Bubble will, ultimately, have a domed top. This may impact clearance of decorations, so assemble the tank, without water, before moving forward to ensure everything clears. We received an LED caplight from the brand, which we use on the top of our tank. It rests on the groove/opening where you will be able to feed would fish nightly. Unfortunately, the brand doesn't seem to have addressed aquatic heating as of yet. Pretty much all fish will thrive most in a stable water temperature (typically the type of fish you will fit in this habitat will need 65-75F) water. Currently the only heating solution I can find is to run a fourth cord along the side and place a heating rod in from the top.
When you go to the pet store to pick out your fish there are a few things still to consider. Whether going saltwater (more advanced but possible with the
Bio Bubble) or freshwater, you will need to prepare and treat your water in advance. All water should be properly filtered with special drops, and left out to reach room temperature as to not shock the fish. Keep in mind the size of your aquarium (which I felt should be written in several more places in brand literature, and much more predominant), in this case 3 gallons. You will need to ask trained staff how big fish will grow- we were advised guppies were the smallest stocked fish that could fit happily in groups more than 2 in this size tank. Also consider species compatibility, and always get one gender of fish (or expect offspring).
Are you ready to see the final result of our Bio Bubble Aquarium? You'll have to tune back in on April 9, when we reveal our aquarium setup, it's inhabitants, and giveaway a Premium Bio Bubble Kit (with accessories) during Blog POP! Spring Fling!
What Daughter Says: Modern products are exciting, but they also require patience. Rely on reviews and customer support to guide you along the way.


You had me hooked just from the name! Sounds interesting. I will check back later to see how your fish are doing in it :).
ReplyDeleteMy daughter would like her own fish. This looks like a really cool option.
ReplyDeleteThis looks so fun! My husband has been wanting to get a new aquarium since we haven't had one in years, but wanted something small. This could be perfect!
ReplyDeleteThis really looks so cool!
ReplyDeleteCan hardly wait to see the finished product and the happy Gary enjoying it. Sometimes putting things together frustrate me too so I give it to my daughter to figure out. It is good the company is listening and putting more instructions up for their customers.
ReplyDeleteAw this looks so cool! I never had a aquarium- my fish always dies within a day lol but this looks super fun!
ReplyDeleteThis is pretty interesting. I think my grandkids would like this for their turtles!
ReplyDeleteI am TOTALLY in love with this!! I wanted to get a fish tank, but was worried about my 3 year old reaching into it. This is SO cool. Love the cages for little furry guys too.
ReplyDeleteQuestion - I visited their site, and can't find a way to order one??
Way too complicated for me but I can't wait to see what you put in your Bio Bubble!
ReplyDeleteCan't wait to see the final product and this makes me realize I am not treating my beta, Mr. Darcy, as well as I should! It's about time he got a new, cool home. - Katy
ReplyDeleteI have been considering this for a while, but you are making it very appealing - this might be a perfect time and age for the kids
ReplyDeleteI was eager with anticipation to see the final setup. Now I really want to come back on Thursday!!
ReplyDeleteLove this! I've been looking all over for the right aquarium for my little guy! :)
ReplyDeleteThis would make a great. I was wondering how this sets up, now I know. Thanks.
ReplyDelete