We've come a long way from boxed mixes, Toto. I still remember standing on my Little Tikes step-stool and peering over the kitchen counter as Momma calmly counted out egg whites into a mixing bowl. Baking Saturdays were especially exciting in my household because they meant the promise of sweet things to come. And, every now and then, Momma would open a box of 'just add water' brownie mix and I'd even get to lick the spatula of gooey chocolately goodness. It was pure heaven, and the only time it got any better was when I had the chance to plop those little drops of liquid color into the batter and turn our boring white cupcakes into tie-dyed perfection.


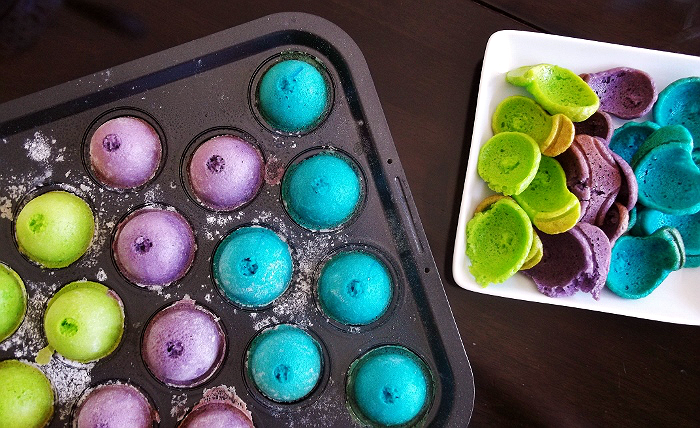
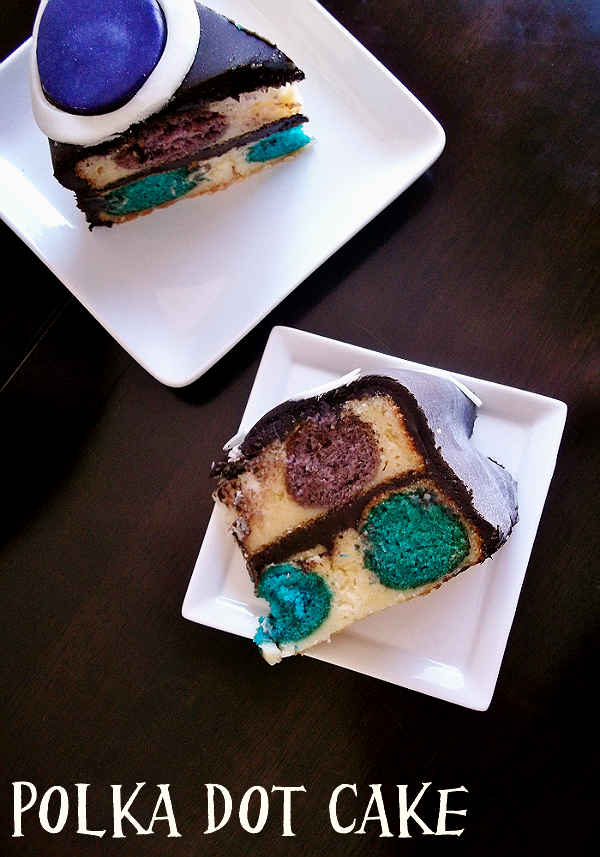
This year I got the brilliant idea to do a 'Polka Dot Cake,' after seeing a viral post on Pinterest from a blog that specialized in baked goods. With a little further research I found that this style of cake isn't really delved into on too many websites. The concept seemed easy enough, bake cake pops into individual cake layers, so why weren't there more people posting their proud pics on Pinterest? Well, as it turns out, while boxed mixes are included in the process, the recipes can be far from 'boxed.' A little patience and some scientific finagling is required.


If you want different size polka dots when you cut into your cake be sure to stagger the rows of dot layers so they are not all lined up when layered. The polka-dot effect will be most effective in three layer cakes, but can be easily achieved with 3 or less colors in a two-layer cake as well. My biggest tip is to make extra cake-layer batter, as you never quite know how well your batter will rise to cover the cake pop balls. When in doubt, more is always better. For my cake I used a chocolate frosting between layers; keep in mind that your frosting will want to smear the 'polka dot' effect when cutting and be sure to keep your knife clean between slices for the most picturesque effect.
What Daughter Says: Life's too short to bake boring cakes.


***Click here for printable Polka Dot Cake recipe.
Ingredients:
*3 White (Not Vanilla) Cake Mix Boxes
*3 Whole Eggs (For Cake Balls)
*6 Egg Whites (For Cake Layers)
*2/3 Vegetable Oil (Divided 1/3, 1/3)
*1C Sour Cream
*1C Milk
*3 Small Boxes Of Instant Vanilla Pudding
*Non-Stick Baking Spray (w/Flour Preferred)
*Gel Food Colors of Choice
Directions:
CAKE BALLS:
1.) Preheat oven to 350F. Pretreat Cake Pop Pan with nonstick flour baking spray or nonstick spray and a light flour dusting. Spray the top of the cake ball pan (outside near vents) to prevent sticking of spillover batter.
2.) Prepare 1 white cake mix box adding a box of instant vanilla pudding and substituting milk for water in recipe. Do not increase or decrease amount of eggs required in box instructions.
3.) Divide batter equally into bowls matching number of colors desired. Add about 1/2 tsp of food color to each portion and mix thoroughly.
4.) Portion cake ball mix to just below edge of bottom pan cavities. Close pan layers with provided silicone seals or clamps and bake at 350F for 13 minutes until bake-over tops are springy but not yet browned.
5.) Allow to cool. Remove the spillover caps before opening the pan. Trim the seams of cake pop balls to round them out if desired. (I did minor adjustments of big seems and was happy with the turnout.)
6.) Place cake pop balls in a large gallon size Ziploc bag and freeze 1-2 hours.
CAKE LAYERS:
1.) Preheat oven to 350F, treat pans with baking spray.
2.) Prepare remaining 2 cake boxes as directed on the box, using the all-white method, with egg whites. Double check that your cake mix does NOT have pudding mix already added to it. Add both remaining boxes of instant pudding, 1/2C milk, and 1/3 C vegetable oil.
3.) Place just enough batter to cover the bottom of your pans. Gently place cake pop balls on top in desired arrangement.
4.) Pour the batter evenly around the balls, saving a portion to gently spoon over the tops and cover the balls. The batter will be mounded but will bake up around the balls.
5.) Bake the layers about 30-35 minutes, or until the cake begins to pull from the side of the pan and springs back when touched.
6.) If your layers have risen unevenly, or have bumps where the cake pop balls have floated, place a damp paper towel on top and gently press down with the bottom of cake pan.
7.) Cool all layers in the refrigerator 2 hours prior to frosting, enjoy!


That cake makes me laugh! It must be such a surprise when people cut in. Did the cake pop dots get dry or overly moist? It doesn't look like it but I was wondering.
ReplyDeleteShelley, I use a high moisture recipe for the pops that features pudding mix, and slightly under-bake them. They were just as moist as the cake, but a teeny bit more dense!
ReplyDeleteRather like cake truffles, eh? You did a beautiful job. I'll bet it was a lot of fun when it was cut open. I love surprises.
ReplyDeleteI love polka dots, and this cake is so fun and lighthearted. I don't know if I would have the patience or skills to pull this off. You are so talented and creative!
ReplyDeleteWow this must have taken you forever to do. I'm not sure I have that much patience LOL. Nice job.
ReplyDeleteTotally crazy creative! May have to try to tackle this for daughter's birthday. She loves polka dots.
ReplyDeleteSo festive - I love the creativity. So cool!
ReplyDeleteWhat a beautiful cake! I love it wish I had a cake pop pan.
ReplyDeleteI love this!! It is so creative! I want to bake a cake soon now that you have inspired me!! Rita Spratlen rjspratlen@gmail.com
ReplyDeleteLooks like an awesome cake! I bet it was yummy, too.
ReplyDeleteMy toddler is really into polka dots right now, and when she saw this cake she just had to have it. I guess I know what we'll be doing for her birthday cake!
ReplyDeleteWow, what a cool idea. So fun and different.
ReplyDeleteDo the cake ball get dried out since they have been baked twice?
This recipe is a pin for me.
Those look adorable! Glad you posted the bit on using a cakeball with pudding base - I was worried about them being dry, but it looks amazing! Yum!
ReplyDeleteThis is a fun cake! It would be perfect for a party! Thanks for posting it.
ReplyDeleteJana Brantley
janaluvsdaisies@gmail.com
i've never seen anything like this and i'm so intrigued! i'm not much of a baking/cooking person, but i may just have to try this. or maybe have my mom try and then one day i'll do it haha. it looks pretty simple enough - just looks like you have to have patience.
ReplyDeleteadoruhs(at)gmail(dot)com
What a fantastic looking cake to make. It definitely will be a surprise for everyone when the cake is cut. It looks quite delicious too.
ReplyDeletetwinkle at optonline dot net
This is such a fantastic and fun cake, but it does seem like a lot of work. Well, at least for me. :-)
ReplyDeleteI can just see hot pink dots for a little girl's cake!
cool, please guidance so that I can create a blog like yours
ReplyDelete