Momma Told Me: Snow isn't all fun, you know!
I can count the number of times I have 'seen' snow on my hands and toes, and all, but one was far from my home state of California. I romanticized the notion of a 'white Winter' so much, as a child, I would literally beg my grandparents in Fall River, MA, to allow me the honor of shoveling their yard on Christmas break. Seriously folks, I would bargain extra chores just to be able to go outside and shovel the snow, okay, so I took a few chunks out of the grass in my enthusiasm, and enjoy the authentic holiday experience. Sadly, I can't say I ever have actually made a snowman; I'm long overdue, wouldn't you say? So, while I sat here, dreaming of a white So Cali-Christmas, I decided I would make the second best thing, cookies that resembled snowmen!


Okay, so I don't just hop out of bed in the morning and decide to make adorable cookies- I'm no Martha Stewart; but I did have 3 potlucks and one 11 year-old's classroom 'banquet' to sort out. In past years I've gone all out for our bowling, league, events and even roasted an entire turkey and chicken on one occasion. This year there simply was too much going on, I would have to break my cardinal, personal, potluck rule, and bring sweets to these events. I always try my best not to do this, especially with people driven dining experiences, such as potlucks, because so many tend to bring an array of store-bought treats to begin with. Nobody wants to arrive at that buffet table and see 14 types of sugar next to a vegetarian chili. So, I knew I would have to compromise, the sweets would have to be bite sized and adorable to compensate for the breaking of my rule.


Because two of the events were Sabrina's (one league potluck and one classroom event), I wanted a recipe that would be easy for her to conquer on her own. Out went the stigma of boxed mixes, and in came the twist of Cake Mix cookies. If you have never made these before they are a true lifesaver; I always stockpile boxed cake mixes for last minute birthdays and events. Making this cookie dough is as simple as adding 1/2 cup of butter and a single egg to your cake mix box of choice. The mixture is fairly sturdy and thick, which alarmed Sabrina- I had to keep reminding her we were making a dough not a batter! The texture actually is perfect for handling with one's hands, which makes it especially fun for younger bakers. However, it is important to remember that the dough will puff and expand in baking, so I typically pat them down with the back of the spoon a few minutes prior to pulling them from the oven.


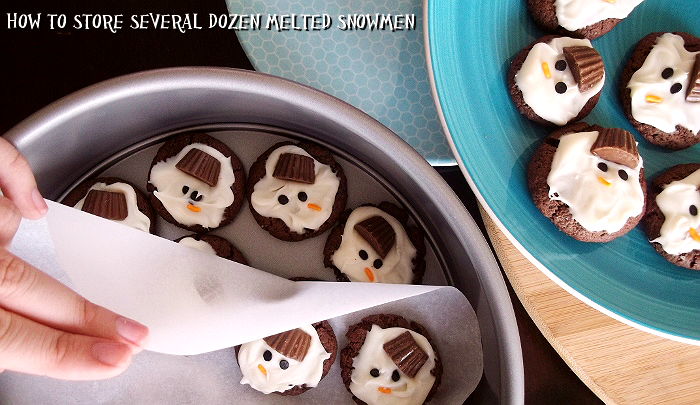
While you can make these Melted Snowmen Cookies with any cake batter, or cookie dough, of your choice, I prefer Devil's Food which plays well with the white chocolate and Reese's as well as allows a natural 'ground' for your melted snowman. Which brings me to, how to store a few dozen melted snowmen- it's trickier than one might think. These 3-dimensional cookies don't stack evenly, and can begin to melt (Reese's) if left in a warm temperature for too long. For this, I took my spring-form pan and used the base to line and cut several round sheets of parchment paper to layer between the cookies. This is also a great sanitary precaution when making large batches and serving groups! But, everyone knows the real treat in these cookies is making the snowmen, themselves- have fun with the faces, you can get some amazing character out of sprinkles!
Did you grow up where it snowed each Winter?
What Daughter Says: I suppose you don't mind shoveling it when you don't see it every day!
Melted Snowmen Cookies
Ingredients:
1 Box of Cake Mix, Devil's Food Preferred
1 Egg
1/2 Cup, Softened, Butter
2 8-10oz Bags of White Chocolate Baking Morsels
1 Stand Up Pouch of Reese's Minis (These Come Unwrapped), Halved
1 4oz or Larger Container of Classic Sprinkles, Orange Seperated
Black Sprinkles, or Black Icing For Eyes (Get Creative)
Directions:
Preheat Oven to 350F
1.) Combine your Cake Mix, Softened Butter, and Egg in a large mixing bowl until dough is formed and contents are well combined. Mixture will be slightly tacky to the touch, but hold it's form easily.
2.) Roll dough into 1.5" balls and gently press between the ball and palm of your hand. Place dough balls onto pre-greased cookie sheet, about 2" apart. Bake at 350F for 9 minutes. Open oven and remove rack. Gently tap down on mounded cookies with the back of a spoon, until even. Return to oven 3 minutes. Remove cookies from oven and allow to cool entirely before decorating.
3.) While cookies are cooling prepare melting chocolate per microwave directions, or over a double broiler. Allow chocolate to cool slightly in melted form, you want chocolate to be tacky, but not melt your Reese's 'hats' on contact.
4.) Start by 'icing' 4-6 cookies at a time with a sloppy layer of white chocolate. Then top iced cookies with Reeses's hat, two coal eyes, and a sprinkle nose. Repeat until all cookies are done. Have fun with your faces, you can create some wonderful expressions!


Those are cute. I will gladly send you a whole bunch of my Vermont snow. I'm tired of it by now.
ReplyDeleteThis is so cute and fun! I think I will do this for the kids too :D
ReplyDeleteThey are very cute cookies and your storage idea is really useful.
ReplyDeleteYou can have my snow too.
This is a really cute idea! I love it!
ReplyDeleteThese are so cute!! I love them!
ReplyDelete